
| Home | Tutorials | Downloads | Forums | Links | FAQ |
| Browse |
Zoning
By: arramus| Adding Pick-ups (Weapons, Health, etc) | Making a Skybox |
1. Create zones
2. Add ZoneInfo actors
3. Create kill zones
AND
4. Play the map
Zoning allows map makers to split a level up into separate zones. Each zone can have its own ZoneInfo actor allowing it to have its own individual Lighting Settings, Name and other attributes.
1. Let's begin by making two large rooms (512x512x256) and a connecting hallway (256x256x256). Apply a texture of your choosing.

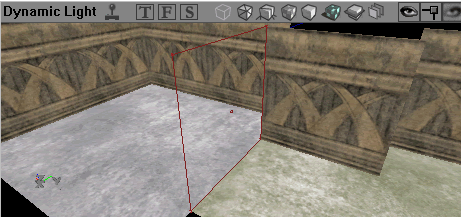
The red box in the hallway should already match it for size. If it doesn't (like the example below) then correct it by opening up the cube builder and set height and width to match your hallway.

Now open up the SheetBuilder
 and make sure the height and width match the hallway box and Set Axis to AX_XAxis. Hit the build button (then close).

Position this sheet so that it is placed in one end of the hallway as shown.
Click the Add Special Brush on the brushes toolbar. It's the blue square icon.

We need a tick in Portal, Invisible, and Two Sided. Ok and Close.

It should look something like this. This texture is OK as it's invisible and won't be seen anyway but maybe add something you'll never use in the level so you know that it's for a zoning area.

I've gone with this one from the Engine textures. There is no mistaking what this is for. :)

Now do the same for the other side. Position the sheet, click the Add Special Brush on the brushes toolbar. We need a tick in Portal, Invisible, and Two Sided. Ok and Close.

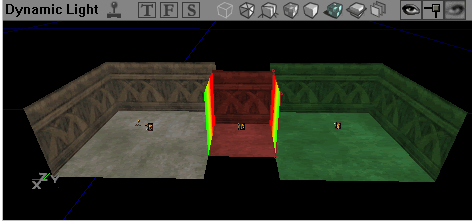
Press Rebuild Geometry (or Rebuild All) and in the 3D view go into Zone/Portal view. You can see the small highlighted box on the top of this image. The different colored areas represent the separate zones.

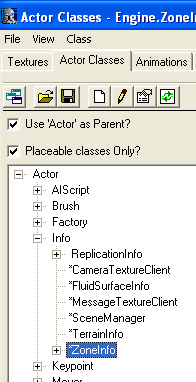
2. Well done up to this point. We can now add the ZoneInfo actor. This sets attributes about the zone. Open up the actor class browser and find Info > ZoneInfo.
Add one into each of your zones. A small ? and Cube icon will appear in each zone.
Now, right click on one of them and go into properties. Light settings can be found in the ZoneLight section and you can give the zone a name (So AI can report their location) in ZoneInfo->LocationName. Each zone can have it's own lighting settings as shown below. Play with the ambience, hue, and saturation to find the light balance you like.
Remember to add a player start point and Build All. :)
3. Now we will add a kill zone. This is not a nice place to be as it will kill AI and players who step in it. To tu a zone into a kill zone, open up its properties and set:
ZoneInfo > KillZType to one of these
KILLZ_None for no death (I selected this one)
KILLZ_Lava for lava death messages
KILLZ_Suicide for suicide death messages
and change ZoneInfo->KillZ to 10000.

Build All > Save
AND
4. Play the map and watch your weapons pile up as you kill yourself time and time again. :)

| Adding Pick-ups (Weapons, Health, etc) | Making a Skybox |
sandcrawler.net is not endorsed by Lucasfilm, LTD. Please read our disclaimer.
Original Content © 2006-2011 Sandcrawler.net
WAP2