
| Home | Tutorials | Downloads | Forums | Links | FAQ |
| Browse |
Adding Collision To Static Meshes
By: DooFi| Expanding your Textures | Sequential Spawning Tutorial |
Adding Collision To Static Meshes
By Doofi
Thanks to Doofi for this great tutorial on how to add Collision to Static Meshes. ~Sandcrawler
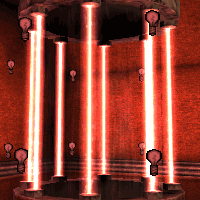 | This model was originally made for this map of mine, which is still waiting for it's release, cause UED crashes at every rebuild I do... It has been modelled in the great boxmodeller Wings3D (free), textured with the help of Paint Shop Pro X and finally converted using the Softimage:XSI Modtools (free). In this tutorial I'm going to show you how I created a collision for it. |
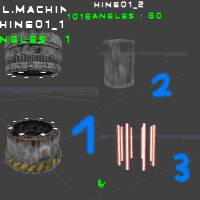 | The machine consists of three parts. The glass is just a cylinder with a nice glass-shader, while the lasers are two two-sided sheets with a moving laser shader (played around with Zbuffer to make them visible behind the glass, but whatever, lol). The lasers won't get any collision, because the player dies, as soon as he touches them, so I will use a volume for that. The collision for the glass in the middle can be made with UnrealEDs simple Collision Tools. |
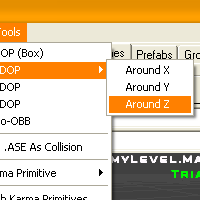 | Just play around with the different options you find under | Collision Tools | in the Static Mesh Browser. You will see that you don't have many opportunities, since the UnrealED Collision Tools aren't too powerful... | Collision Tools | Import .ASE Collision | looks extremely promising, but unfortunately ASE Collision is not implemented yet. Let's hope the next UED can do it. However, for my simple cylinder I chose | Collision Tools | Fit 10-DOP | Around Z |, although I have no clue, what DOP means lol. The main thing is, that it works. |
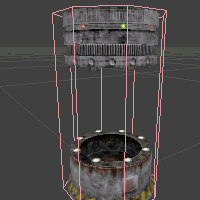 | Now comes the main part of the machine, which actually consists of two seperated parts, united in one mesh. And in fact, thats the biggest problem with this mesh, because you can't use UEDs Collision Tools, since they are way too elementary for complex models like this one. And I'm sure you can imagine by far more complex models that my arranged cylinders lol. Anyways, the picture tells you, what happens to the model, if you apply the same step to it as above. I would not want to put that into my map at least. The collision is very rough, because UED just takes the most exteal vertices and kind of outlines them. You cannot shoot through the large empty space between the two parts and you are not even able to reach the lasers with an ugly and unprecise collision like this, so we will use a much nicer method to create our own. |
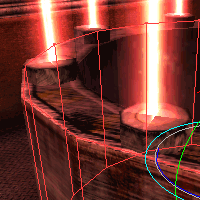 | We add brushes around the mesh! These brushes will finally form the collison. I think finding the right dimensions would have been easier for me, if I hadn't scaled the Static Mesh to 1.0625, but anyways, it works with scaled meshes, too. First I added a cylinder. Outer Radius = 132. I adjusted its height with the Vertex Editing Tool. As you see, I did not care for the small part right at the bottom, because I doubt it will disturb the flow of play, if you can shoot through it, since it is too small. On the contrary I even think, it would probably obstruct the way. After adding the cylindrical brush at the bottom, I self evidently added one at the top as well. |
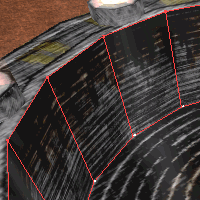 | Because there is a hole in the mesh, I also added a hole to the collision brushes. Again I used a cylindrical brush, but this time I subtracted it from both add-brushes. I found the correct radius via trial-and-error lol. NOTICE: The final collision would be much cleaner if i had build a hollow cylinder first, and then put a solid one under it, as far as i know! Why I used a subtract brush instead, beats me lol. |
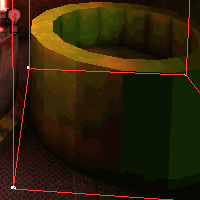 | After leaving the small laser-emitters out, I formed the red build-brush to a big box begierding all of the collision brushes. Lovely picture. What a delicious compression! I should not have chosen a green texture for the collision-brushes lol. |
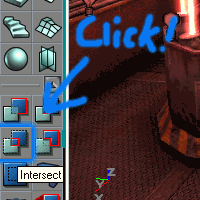 | Then I pressed the mystical Intersect-Button and - drum roll - The build-brush assumes the brushe's shape! Now one has to move the build-brush over the Static Mesh, as you can tell from the next picture. |
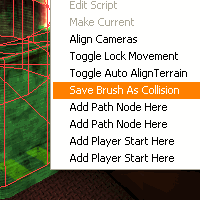 | Select the SM and the Build-Brush and then click on one of them with the right mouse-button. A context menu will appear and you can choose from many neatly arranged options, but one of them reads Save Brush As Collision. And - what a pleasant surprise - that one is exactly what you are looking for! Click on it and fire up the Static Mesh Browser to see the absolute miracle happen! |
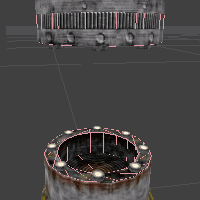 | This is not a very clean method, because UED arranges polygons very weird. It is always better to use a 3D-Application for meshes, because you have total control over all the polygons and vertices and especially the polycount. *.ASE-collision import would make that much easier, but since it isn't implemented, one needs other ways to create collision. Now you know two of them, but there is a further, more precise one. |
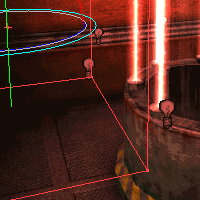 | You don't need to build brushes to create collision. Using this method, you only need your SM and the Build-Brush. Select the SM and right-click on it. You see the same context-menu as above, but this time, you choose | Convert | To Brush | first. The Build-Brush now assumes the shape of the Static Mesh. Don't let it confuse you, everything will be split up into triangles. Thats the case, whenever your computer renders 3D stuff, because there is no shape, simpler than a triangle, so triangles cannot cause errors. Polygons with more than 3 vertices can get deformed so that the computer does not know where to draw the lines between the vertices. Brush-surfaces become triangular, too. |
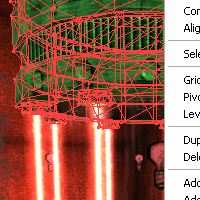 | Make the context menu appear again by right clicking on the SM and then choose Save Brush As Collision, as described above and see the collision appear in the Static Mesh Browser. And that was about it! Done. Hope you understood everything, cause I'm not sure about some phrases, since english isn't my native language ;). In case of questions visit the RC Modding Community Forums |
| Expanding your Textures | Sequential Spawning Tutorial |
sandcrawler.net is not endorsed by Lucasfilm, LTD. Please read our disclaimer.
Original Content © 2006-2011 Sandcrawler.net
WAP2