
| Home | Tutorials | Downloads | Forums | Links | FAQ |
| Browse |
Textures, Static Meshes, and Skyboxes
By: Sandcrawler| Path Nodes, Volumes, and Zones | Movers, Triggers, and Usuable Doors |
1. The Texture browser and how to apply them.
2. Adding and manipulating Static Meshes.
3. Create a skybox
And
4. Play the Map
1. Lets start by texturing the map, our building texture has worked great for its purpose, but you'd never want to play a map with bight colored squares on it would you? Open your Texture browser, and browser to the KillingFloorTextures package. Now click the All button and then the Load Entire Package button (three sheets). You should see something like this:

Now lets find some textures that we would like it use, you can either scroll threw the package until you find one you like, or you can try Filtering the texture by name.At this point you could also shut All back off and change the group to LondonCommon to remove some of the static mesh textures. Once you have found one navigate to the location you would like to place it, now lets place it. You can do this two ways, the first is to click on the surface you'd like to apply the texture to and you will get a blue overcast, now just click the texture you would like to place.

The second way you can do this is by selecting the texture you want to place and holding down Alt then left clicking where you want to place the texture. This is my proffered method. Now go ahead and apply textures to all the locations you want them. When you are done we align the textures.
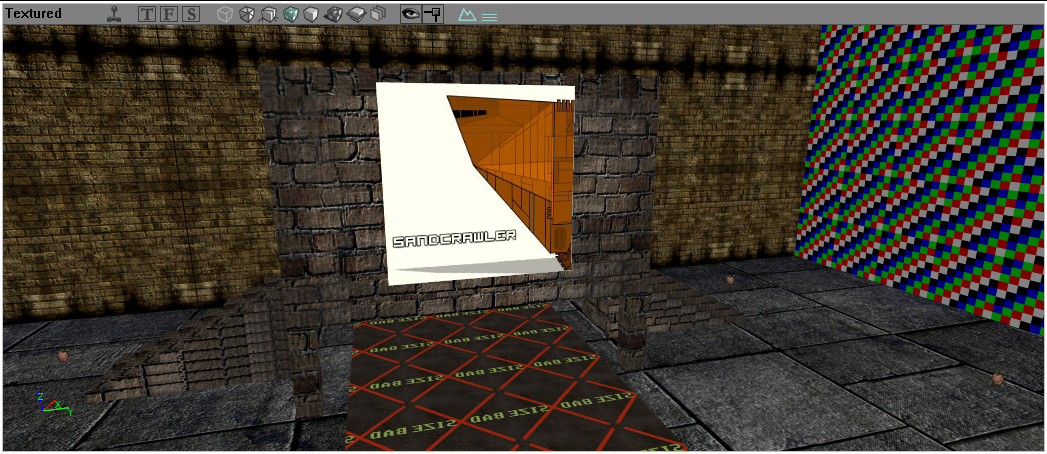
While placing your textures you may notice that some of them don't line up quite right, here is one such location in my map. To fix it we will first left click on the surface, then right click on the selected surface and open the Surface Properties box.

We don't need to change anything in the Flags tab, we need to Pan, Rotate, and scale our texture, so go to the Pan/Rot/Scale tab and you will see something like this:
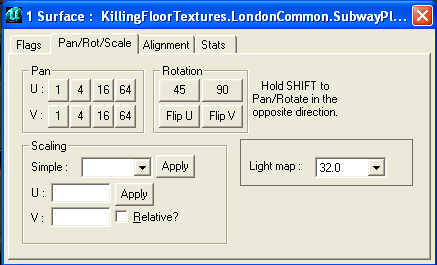
Now this is not a quick process of aligning textures, but if you take your time you can align them perfectly. The U: number buttons pan the texture left and right, while V: pans the texture up and down. You may also need to rotate the texture, or even flip the texture inside out. You have all of these options at your disposal. When you finish or want to move on next I am going to show you how to import your own custom textures.
Alright now for the last part on texturing, let import a custom texture. I am going to import this one:

Now before you try to import a texture you need to have it in one of the following formats:
.bmp
.pcx
.tga
.dds
.upt
It should also be size to a multiple of two, 128x128, 256x256,512x512, ect. Now while you are in the Texture browser click on File, and then Import. A file browser window should open, pick your texture and another window will open. This is the place you set the package and group in. We don't want to make an extra download for just a handful of texture so we are going to use the myLevel package.

Now push ok and it will take you to the package you entered and the group you entered. That all there is too it. (if you don't see your texture try changing the group and then changing back) You can use myLevel texture just like normal, the only difference is that they stay with the mapfile.
2. Now lets have some fun with Static Meshs. in this tutorial we will only be working with the static kinds of static meshs. Static Meshes include weapon pickups, doors, and so on down the list. They can make your map look a lot better as well if you use them right. With that lets get started, open the Static Mesh browser, and navigate to the KillingFloorManorStatics. You will see only three or four static meshes at this point, this is because like the Texture browser it doesn't load the Entire package until you tell it to. So go ahead and click the All button and then the Load Entire Package (three sheets). Should look like this now:

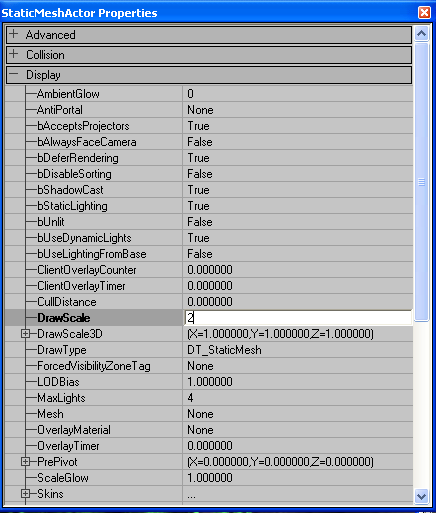
I want to add a roof to my traders shed, and I though the tin sheet called WetSheet_Metal would work good. Now I want to use as few static meshses on the roof as I can, so I'm going to scale them. You can do this with any static mesh, and her is how. After you placed you static mesh select it, right click and go into the Properties menu. Now go into display and change the Draw Scale.
Now it is just a matter of rotating the static mesh until you like it, you can hold ctrl and right click to rotate it, and left click to move it. The draw scale and be very helpful when you are working with trees or grasses, it give a variety to them. Now lets import a custom model, this process is similar to importing a custom Texture. You will need the following:
Compatable format-
.ase
.lwo
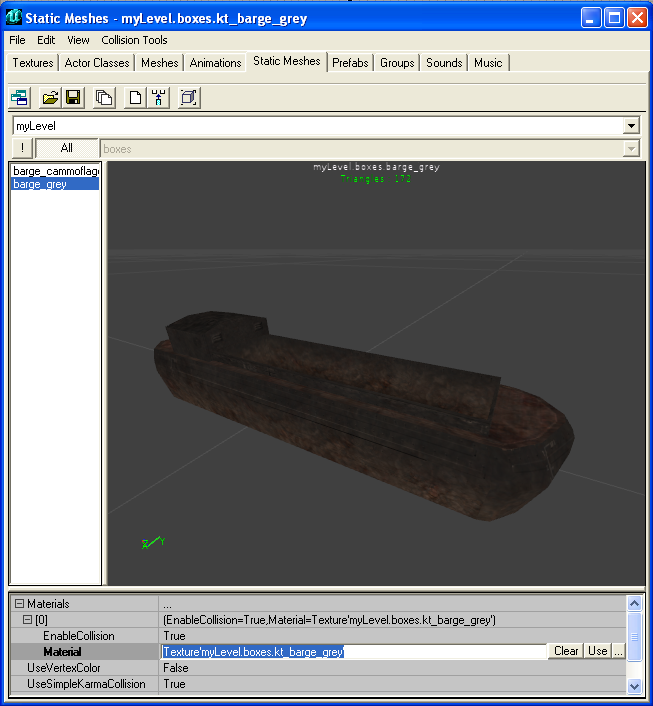
You will also need to have your texture that goes onto the mesh. I found the static meshes I'm going to import today on KatsBits, so all credit for the models and texture go to them. Now with your model format and the static mesh browser open go to File > Import. Another window will come up with the package settings, set this the to the myLevel package, and if you'd like to a group. Simply hit ok and your model is now imported into Killing Floor. But its just the default texture, now you need to import your texture, I'll let you go ahead and do that. Lets now apply the texture to your static mesh. Go to the Texture browser and select the Texture you want you model to use. Now go back to the Static Mesh Browser, You'll see at the bottom there is a Materials category, and inside there is a [0]. Open the [0] menu and you will see another Materials section, left click on this one it will allow you to enter your package. Its easiest to have your texture selected and simply hit Use.
At this point I tested my map, and the new static mesh worked.That's all for Static Meshes until next time when we do Doors and Movers.
3. Now lets create a Skybox. For now we are only going to make a basic brush skybox, we can always change it later. So you will need some sky texture, you can find some here or just do a google search for some. I got mine from Hazel Whorley site. First lets just import the texture once again to myLevel, but this time we want to change a settings. We want to compress the textures we just imported in to DXT1. To do this you need to right click on the texture, go into Compress and click DXT1.

Now you need to make the Box for your skybox, this is just like it sounds, create a Box with the Cube tool and Texture it with your skybox textures. Make sure all of your skybox textures line up right and thats all there is to this step, now lets add in the ZoneInfo that makes it all work. Open the Actor Browser and go to Info > ZoneInfo > SkyZoneInfo and then right click in your skybox and place the actor. Now right click and bring up the Properties menu, we need to make the ZoneInfo Directional so it know what way to look. In the Advanced menu change bDirectional to True, you will also want to set the lighting up:

That is all we have to do in the skybox area, now go back to you map and open up the Surface Properties box. Go to the Flags tab and select the surface you want to show your skybox. Now just Tick Fake Backdrop and test out you skybox by playing the map. (Skybox don't show at all in the editor) You may need to pan or scale the textures some so it doesn't look all boxy, you may also want to move the ZoneInfo around to adjust the angle. Thats you basic Skybox, the retail map use a more complex skybox made up of Static Meshes, Fog, and animated textures applied to more static meshes. If your map can use one of the retail skyboxes I would use it. If not This looks ok, but the texture will always be a little bit off.
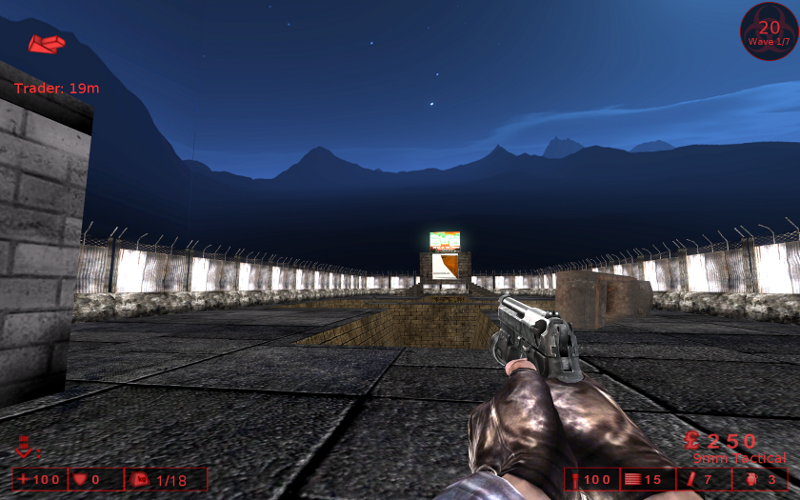
4. Now lets play our map, and see how all our hard work is start to pay off.
| Path Nodes, Volumes, and Zones | Movers, Triggers, and Usuable Doors |
sandcrawler.net is not endorsed by Lucasfilm, LTD. Please read our disclaimer.
Original Content © 2006-2011 Sandcrawler.net
WAP2